| Step 5
Load Petal 2, and again, select it by clicking inside
the petal with the magic wand. Expand the selection by 1, and add
a new layer. Do not deselect.
Using your airbrush with the same settings as used
in the first petal, spray some color into the petal. Most of the
petals are done in the same way as the first one, with minor variations
in the placement of the shading colors.
Keep this petal selected, and go to blur/gaussian blur/5
(or higher if you need it). Again, use the smudge tool with
the same settings as for the first petal, and smudge some color up into
the pale part of the petal, as in the picture below. You may have
to set the size of your smudge tool to about 6 for the larger lines to
work for you.
In your layer palette, make all layers but the line
drawing layer and coloring layer for this petal invisible. Go to
layers...merge...merge visible. Name this merged layer Petal 2.
Step 6
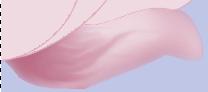
Now we'll work on Petal 3, which is behind the main
part of the rose, so it's a good idea to have the main part visible while
you're working on this one so that you can see where the shading needs
to go. Again, select the petal by clicking inside it with the magic
wand, expand the selection by 1, and add a new layer. Do not deselect.
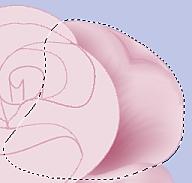
Using your airbrush with the same settings as for the
first petal...size 80...hardness 0...opacity 11...
step 1...density 100, spray heavily at the bottom
of the petal where it joins the flower. Bring the shading up until
it's past the main part of the rose, as in the picture below. Make
your airbrush size about 6, and spray around the part of the petal which
is curved over...the v-shape...very close to the line. Spray a little
of the color on the tip of the bent over part of the petal, and then use
white along the top of that part.
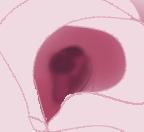
Gaussian blur at 5, then smudge some of the darker
paint into the lighter part of the petal. On the shadow under the
bent part of the petal, narrow the shadow at each end by smudging the lighter
color into the darker color, as below.
Look closely at the above picture, and remember to
keep your smudge strokes curved to follow the direction you want the petal
to go. For this one, smudge to the right with a curved motion.
Since this is a larger petal, you could set your smudge brush size to 2
if you find it easier. I found that the settings for the smudge tool
were largely a matter of experimenting to see which worked best for what
I was doing at the time.
Again, in the layer palette, make all layers invisible
but the line drawing layer and the coloring layer for this petal, then
go to layers...merge...merge visible. Name this layer petal 3.
Step 7
The fourth part is the one I found the most difficult.
It has to be dark in the middle, which is hard to do without losing the
definition that the drawn shape gives it. So, I just sprayed heavily
in the outer part of it with the airbrush and the darkest color in the
palette, then used a smaller size airbrush in the very center part with
the darkest possible shade of the same color. It's easier to show
than to explain, so here's a screen shot of it.
When you're done this, go to the layer palette, make
invisible all but the line drawing layer and coloring layer for this petal,
and go to layers....merge...merge visible. Name this layer rose centre.
Next
Page
All graphics and content copyright 2001 Rainbow Row Graphics
|