| Step 8
The last two petals are the two I found the most enjoyable
to work on, since the shading is a little more interesting.
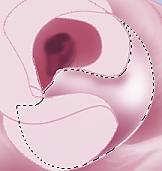
Load Petal 5, and select the larger part at the bottom with your magic
wand. Modify the selection...expand by 1, and add a new layer.
Do not deselect.
Shade this part in the same way you've done the other
petals. Use your airbrush, and spray quite heavily at the bottom
of the selection and lighter higher up toward the top. Lower the
size of your airbrush to about 6, and spray under the left hand side of
the part that's folded outward on the top, as shown below. Right
in the middle of the curved out part of the area you're working on, spray
a fairly large dot of white, to bring out the curve.
Do not deselect. Gaussian blur 5. Use your
smudge tool to bring out some of the darker color into the light, as in
the other petals, and smudge the shadow under the lip of the upper part
of the petal at the left end, as shown below.
Step 9
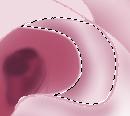
Now select the part of the petal that's turned back
at the top of the one you just finished, expand the selection by 1, and
shade as below.
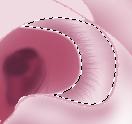
Again, using your smudge brush, pull some of the darker
color into the lighter color, remembering to curve the lines to follow
the shape of the petal, as below.
Gaussian blur, but set it to a lower number between
1-3, so as not to lose the definition of the fine smudged lines.
If it doesn't look right the first time, just undo and try a different
setting. You'll notice a small line between this part of the petal
and the middle part of the rose. We'll deal with that later.
Step 10
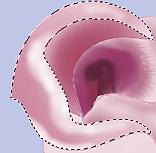
Now we'll work on the largest petal. The shading
is done with one of the darker shades, and white. Click inside the
top part of the petal that's turned outward, and expand the selection by
1. Keep selected, and add a new layer. Shade as below.
Gaussian blur 5, then smudge tool set to size 1, pull
out some of the darker color into the white, as below.
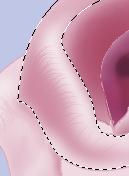
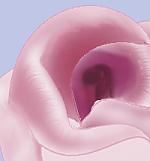
Gaussian blur set to one or two. Anything higher
will take out the fine lines you smudged. The top of the petal should
now look similar to the picture below.
Step 11
Select the lower, outside part of this petal with your
magic wand, and expand the selection by 1. Shade as below.
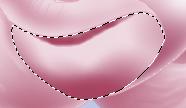
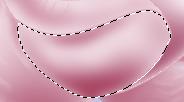
Gaussian blur by 5, and your petal should look similar
to the picture below.
Step 12
Now select the inside of the same petal, as in the
picture below,
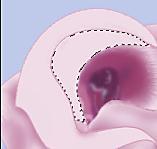
and spray the entire area with one of the darker shades
in your palette. Don't deselect. Gaussian blur by 5.
Now you can deselect.
Step 13
Your petals are all colored, and now's the time to
deal with the little 'cleanup' details. On the petal you just finished,
there's a line showing that was there as a guideline for the top of the
petal that turns out, as in the picture below.
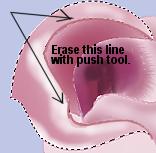
Go to the layer with the line drawing on it for that
petal, and using your retouch tool set to push, sizeto about 3...opacity
and density to 100 and step to 1, start close to the line and 'push' the
lighter color over it. You should see the line disappear.
Go to your layer palette, and make all but the coloring
layer and the line drawing layer for this petal invisible. Go to
layers/merge/merge visible, and merge the two layers.
Using your smudge brush (don't forget to reset to the
original settings you used, since the push tool uses the same settings),
smudge the darker color of the inside of the petal up into the lighter
part, as shown below.

Step 14
On the smaller petal with the turned top, there is
a similar line showing, shown below.
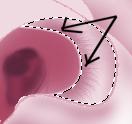
Go to the line drawing layer for that petal, and remove
the line the same way as above.
Now go to the colored layer for the center of the rose,
and click inside the lighter color with the magic wand to select it, as
in the picture below. Since this was colored with the airbrush, you
will likely have to set your tolerance fairly high. I set mine at
25, to make sure I got the entire area in this selection.
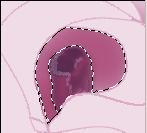
Do not deselect. Add another layer and use the
airbrush to color the selection on the new layer.
Deselect. In your layer palette, drag the new
layer above the colored layer for the turned petal. Make all layers
invisible but the petal line drawing, the first coloring layer, and the
new layer you just created. Merge the three layers. Now you
can smudge the colors into each other to create a smoother transition between
them, as below.

Step 15
Using your paintbrush set to size 3, opacity and density
to about 30, color white, draw some defining lines on the edges of
the middle petals, as below.

Using your push brush set to about size 2...hardness
100...opacity 100...step 1...density 100, clear up any messy edges, such
as in the larger image above on the edge of the petal to the right.
Go to layers...merge...merge all. Add some leaves
and your rose is done!
I hope this hasn't been too boring, and that it's been
of some help to you.
If you encounter any difficulties, please contact
me and I'll do my best to clarify things for you.
Thanks!
All graphics and content copyright 2001 Rainbow Row
Graphics
|

