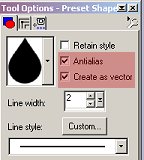
Hmmm...I heard that!!! So I promised we were almost done...and we are! This is the last page! I'm sure that collective sigh of relief could be heard in downtown Burbank! LOL 66. Add a new raster layer. At the upper end of the brush, with your preset shapes tool set as below, draw a teardrop shape as shown. The colors I chose are #CCBD82 for the foreground color, and #E4D1A6 for the background color.
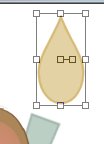
67. Click on your object selector, then right click inside the box around your brush and click on 'node edit'. Adjust your nodes until they look similar to the image below.
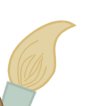
68. Now go to your layers palette, right click on the brush layer, and then 'convert to raster layer'. 69. Using your freehand draw tool set at 1, draw some lines inside your brush shape with the darker of the two colors you used set as foreground, and the background set to null.
70. With your selections tool, draw a rectangle around your brush shape, and click inside it to select the brush. Add a new raster layer. 71. Use your airbrush to spray some of the color you used for your paint on the brush, as shown below.
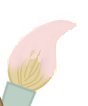
72. With both your foreground color and background color set to the paint color you used on the brush, use your preset shapes tool to draw two or three teardrop shapes under the brush tip, like drops of paint falling from the brush. 73. Now go to 'layers/merge/merge visible', and you're left with only one layer. 74. If you've been working on two separate canvases for the mouse and the paint can, you can now go to 'edit/copy' to copy your mouse to the clipboard. Open up your paint can image, and go to 'edit/paste/as new layer', and your mouse will be copied to a new layer on top of your paint can. 75. You'll probably have to enlarge your canvas now, so go to 'image/canvas size', and change the dimensions so that you have enough height to place your mouse near the top of the paint can, as shown below.
76. Using your eraser tool (!!!), erase the part of the mouse body that overhangs the front of the can, as shown below.
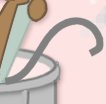
77. Using your draw tool set at freehand, with a line width of 4 or 5, draw a tail curving up out of the can beside the mouse, as shown below.
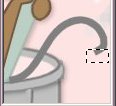
78. Use your selection tool to narrow the end of your tail, as shown in the image below. Hit delete key when you have the selection made.
79. Put a little ribbon in her hair...you can download mine here if you like...and believe it or not.......YOU'RE DONE!
THE END
All joking aside, I do realize that this tut is very lengthy.
Created February 4, 2002
|