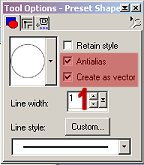
9. Add a new raster layer. 10. With your preset shapes tool set as below, draw an ellipse at the upper right part of the head, as shown.
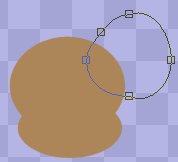
11. Click on your object selector, right click inside the box around the ear, and scroll down to 'node edit'. Adjust your nodes until you get a shape that looks pleasing to you, as in the image below.
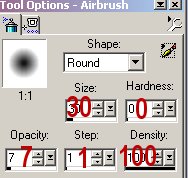
12. Now go to your layers palette, right click on the ear layer, and click on 'convert to raster layer. 13. Make sure that your ear layer is the active layer, then go back to your image and using your selection tool, draw a rectangular selection around the ear. Click inside the rectangle to select the ear. 14. Add a new raster layer. 15. Go to 'selections/modify/contract', and contract by about 8. 16. Choose a lighter and a darker shade of the same color to do your shading with. I used #FEDADA for the lighter of the two, and #FF8080 for the darker. Set the lighter shade as your foreground color. 17. Using your airbrush, set as follows, lightly spray the color from the inside edge of the ear up to the outer edge of the selection. It works better if you just tap your mouse button rather than holding it down as you spray.
18. When you've reached a look you like, do not deselect. Go to 'effects/blur/gaussian blur', and set it to about 3-5. Click OK. Do not deselect. 19. Add a new raster layer. Click on the little corner arrow in your color palette to switch the background and foreground colors. Change your airbrush settings to those shown below,
and spray the color only part way up towards the outer part of the selection. 20. Again, go to 'effects/blur/gaussian blur', and blur by 3-5. Go to your layers palette and click on the glasses icons to hide the head layer, then click on 'merge visible layers' to make one ear layer. You should have only two layers now...the head layer and the first ear layer. 21. You can draw another ear on the other side of the head, or do as I did and duplicate the ear layer you just finished. Go to 'image/mirror', and move it to the other side of the head. Rotate a few degrees left, until it looks the way you want it to, then go to 'effects/sharpen', and sharpen once. 22. Go to your layers palette, and drag your head layer to the top, so that your ears are behind the head. 23. Now with your head layer active, use your retouch tool set as
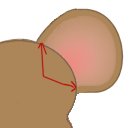
before, and push the lighter color over the dark color where the head and
ear meet, as shown. If you end up with a messy edge on the head layer,
just use your push tool again. Push from outside the head shape into
the edge in a rounded motion from top to bottom of the area you want to
erase, and it will erase any stray pixels. Or, you could use your
eraser to clean it up...some people do prefer to do things with conventional
tools! LOL
24. Now go to 'layers/merge/merge visible', and you'll have
only one layer. Name this layer 'head' or whatever you like.
|