| Although I'm not really good at writing tutorials,
I decided to give this one a shot when a dear friend asked me how I'd made
these bells. So please bear with me as I stumble through yet another
attempt at tutorial writing! LOL
Please don't let the length of this tutorial deter
you from trying it. It's actually very simple to do, but I
have a hard time figuring out how much to explain so I err on the side
of caution. I hope that the depth of explanation I try to achieve
in order to explain what I'm doing will make it easier for the novice
user of PSP to follow, as well as for those more experienced.
PLEASE DO NOT CLAIM THIS TUTORIAL AS YOUR OWN WORK.
IF YOU WISH TO USE IT FOR A GROUP PROJECT, PLEASE EMAIL
ME FIRST. DO NOT UPLOAD THIS TUTORIAL TO YOUR OWN OR ANY OTHER SITE
FOR OTHERS TO WORK FROM. IF YOU FEEL THAT SOMEONE MIGHT ENJOY IT,
PLEASE OFFER A LINK TO THIS SITE . THANK YOU!
You'll need the following for this tutorial:
Paint Shop Pro--I
did these in version 7, but I'm sure they'll work in earlier versions.
You can download a fully working evaluation copy here.
Bell
selections--download here. Unzip to your PSP selections folder.
If you don't have one, create one now.
A lace pattern--I've included one in the zip
file, but you can use your own if you prefer. Unzip the lace pattern
to one of your image folders.
Blade Pro--you
can download it here, and a gold preset. Or you can just use a metallic
effect in PSP if you prefer.
Note: I didn't include selections for
the ribbon since I thought you'd have fun creating your own.
There are several tutorials for making ribbons, one
of which can be found here.
If you go to the link provided, make sure to check out Wompie's other tutorials.
She has some great ones! I've also given a quick run through on how
I made my ribbons at the end of the bell tutorial.
Note 2: At several points throughout this
tutorial, I refer to 'setting up' your tools. Once you've chosen
the tool you're going to use, click on your tool options icon  to load a window in which you can set up the way you want the tool you're
using to work, unless your tool options panel loads automatically when
you open PSP. Depends on how you have your preferences set.
to load a window in which you can set up the way you want the tool you're
using to work, unless your tool options panel loads automatically when
you open PSP. Depends on how you have your preferences set.
OK, let's get started!
1. Open a new transparent image, 287x396,
16 million colors. (I know that sounds like a weird size to begin
with, but it has to be this size in order for the selections to place themselves
correctly.)
2. Add a new layer, and load your bell
selection. 'Selections/load from disk', and open the 'bell.sel' selection
you downloaded.
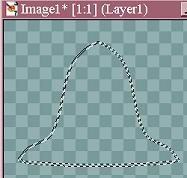
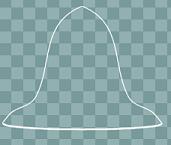
3. Set your foreground color to white,
click on the flood fill tool  ,
and flood fill the selection, as shown below. Deselect...selections/select
none. ,
and flood fill the selection, as shown below. Deselect...selections/select
none.
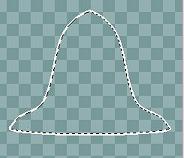
4. Click on your 'magic wand'  ,
and click inside the outline to select the empty area. ,
and click inside the outline to select the empty area.
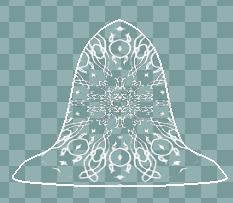
6. Open your lace image, and go to 'edit/copy'.
7. Go back to your bell outline image,
which should still have the 'marching ants' around the inside of the outline,
and click on 'edit/paste/paste into selection'.

and this is what your bell should look like now.
Do not deselect.
Page
2

|