|
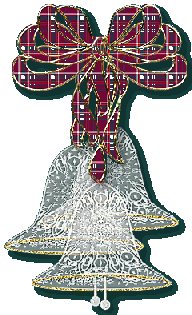
Making the bow...page 2
12. Highlight layer 1, the one with the outline
shape in white, in your layer panel. Click anywhere in the white
outline in your image to select it, then go to 'image/effects/plugin filters',
and choose Blade Pro. Apply a gold preset, or another of your choice.
13. Deselect. Go to 'layers/merge/merge
visible'.
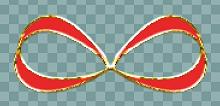
14. Go to 'edit/copy' to copy your loop image,
then go to 'edit/paste/as new selection'. Do not deselect.
15. Go to 'image/mirror', and your loop will
be facing the opposite direction. Now place it point to point with
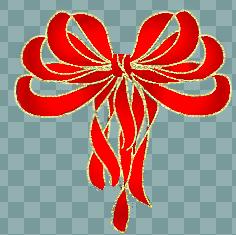
your original loop, and you have a bow, as shown below.
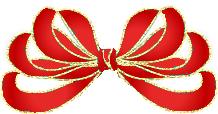
16. You can make other loops in the same way,
or just resize and rotate the original one to make it a little different,
then put 3 or 4 one on top of the other to make a bow similar to the one
below.
17. Once you have your loops assembled to your
liking, go to layers/merge/merge visible.
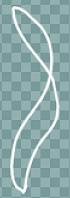
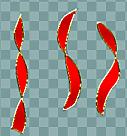
18. Add a new layer, and draw a knot in the centre
of your bow, and color it in the same way as you did the loops.
19. To do the hanging ribbons, open a new transparent
image, 300x300. Using your draw tool set to freehand, size 2, antialias
checked, draw a shape similar to the one below.
20. Use your magic wand while holding down the
shift key to select the two open areas inside the shape.
21. Add a new layer. Go to 'selections/modify/expand',
and expand by one.
22. Flood fill with the same color as you used
for the bow. Drag this layer below the first layer.
23. Again, 'push' the color into the spaces that
weren't covered in the fill, as you did for the bow.
24. Highlight your first layer (the white outline),
and click anywhere in the white area to select it.
25. Apply the same effect as you did for the
edges of the bow loops...either a Blade Pro preset, or a metallic effect
in PSP.
26. Layers/merge/merge visible, and go to your
layer palette and right click on the merged layer, then click 'duplicate'.
This will give you two ribbons this shape.
27. Make a couple more different shaped ribbons
in the same way, each one on a new layer, and duplicate each of them one
time. You should have 6 ribbons when you're done.
29. Now open up your bow image, go to 'edit/copy/'.
Now click on your ribbons image to make it the active image.
Go to 'edit/paste/paste as new layer'. Arrange the layers containing
the ribbons until they look pleasing to you, and then go to 'layers/merge/merge
visible'. Now you can add a new layer and paste into it whatever
you want to hang from the ribbons, such as the bells you just made, little
heart shaped pillows, fancy jeweled shapes, small toys, etc. ...whatever
takes your fancy! You may have to resize either the bow or the items you
hang from it so that they're in the proper size ratio to each other.
Note: If you prefer ribbons without the
metallic edges, use a darker shade of the color you've chosen for your
bow with which to draw the outlines, rather than white. If you're
doing solid color ribbons, rather than plaid or striped, flood fill your
selections with a sunburst gradient. Use a lighter and darker shade
of the color you chose, choose a foreground/background gradient, and it
will make your ribbons appear shaded, like satin. This works better
if you flood fill only one section at a time, rather than selecting all
parts to be colored at once.
I hope you've enjoyed this tutorial.
If you have any problems, don't hesitate to contact
me,
and I'll do my best to help.
Pat

Tutorial created October 28/2001
This tutorial and all images contained herein
© 2001 Rainbow Row Graphics
All rights reserved.
|